Spherical Shader User Guide
User guide version 0.1.0.2 for Spherical Shader, available on Fab (Unreal Engine Marketplace) here.
Table of Contents
Introduction
Spherical Shader allows you to create the illusion of a spherical world by simply using a Material Function and a Blueprint Component. Although a Material Parameter Collection is used by the Material Function, its parameters do not need to be directly set. They are controlled by the Blueprint Component.
To use the shader effect:
-
Add the Material Function MF_SphericalShader to your material and plug it into the World Position Offset
-
Add the Blueprint Component BPC_SphericalShader to the player character blueprint
That’s it! The settings are adjusted in the Blueprint Component on the player character. For detailed instructions, see the tutorial section below.
Contents Included
Required Content
When Spherical Shader is added to your project, the following required content will be added to the folder Content/SphericalShader/Shader.
-
MF_SphericalShader: The Material Function with all the shader logic to create the sphere effect
-
MPC_SphericalShader: The Material Parameter Collection that adjusts parameters in the Material Function
-
BPC_SphericalShader: The Blueprint Component that is added to the player character, or other actor, which the sphere effect should move with
Demo Content
Additional demo content which showcases the spherical effect will be added to the folder Content/SphericalShader/Demo. This includes:
-
A map featuring Static Meshes, Landscape, and Foliage where their materials or master materials have MF_SphericalShader added
-
A player character with the blueprint component BPC_SphericalShader added to it
-
Additional functionality to demonstrate changing radii. The player can right click, or press the B button on a gamepad, to change the radius of the sphere while playing.
A detailed breakdown of the demo content can be located further down in this document.
Definitions and Usage
MF_SphericalShader

This Material Function contains all the shader logic for the sphere effect. Add this Material Function to materials you wish to appear spherical.

If you have other World Position Offsets you wish to apply, simply add this material function to them as shown.
BPC_SphericalShader
This Blueprint Component is added to the player character, or in some cases a camera actor. It automatically sets the parameters in MPC_SphericalShader so that you don’t have to! It automatically makes sure that the sphere effect moves with the actor that it’s added to.
These are the settings for BPC_SphericalShader when it is added to a blueprint and selected.

-
Sphere Radius: The radius of the sphere effect. A larger radius means less curviness, and a smaller radius means more curviness.
-
Fixed Ground Plane: Used only if the boolean Use Fixed Ground Plane is checked. This is the height where the ground plane is, such as the default elevation of your terrain. When Use Fixed Ground Plane is checked, the center of the sphere effect is determined from this Z position and not the actor’s Z position.
-
Use Fixed Ground Plane: When checked, the sphere effect will not move vertically with the player, only horizontally. Having a fixed ground plane increases the believability of the sphere effect, since terrain typically does not change curvature based on a player’s position in the air. However, for some games, where vertical movement is drastic, disabling this might have a more desired effect.
MPC_SphericalShader

The material function uses these parameters. You do not have to set these parameters directly if you have added BPC_SphericalShader to an actor.
-
Radius: Distance below Actor Location that is the center of the sphere effect
-
Strength: This serves a binary value, 0=Off and 1=On. This has been added so that the effect can be turned on or off via script, and so that the effect can be off by default to make it easier to work with in the editor viewport.
-
Actor Location: This is the actor location of the actor which has BPC_SphericalShader added to it. This parameter defines where the top of the sphere is and is used to determine the center point of the sphere, i.e., the point below this location the distance of the radius.
Tutorial
The following tutorial is an example of how to add Spherical Shader to your own game. For this example, we’ll be using the Third Person template.
1. Create a new project in UE4 using the ThirdPerson template and using No Starter Content.
2. Add Spherical Shader to this project, either through the Epic Games Launcher or by migrating Spherical Shader from another project.
3. Once the shader has been added, select File --> New Level and choose Default.

4. In the Content Browser, go to the folder Content/Geometry/Meshes and double click the material CubeMaterial.

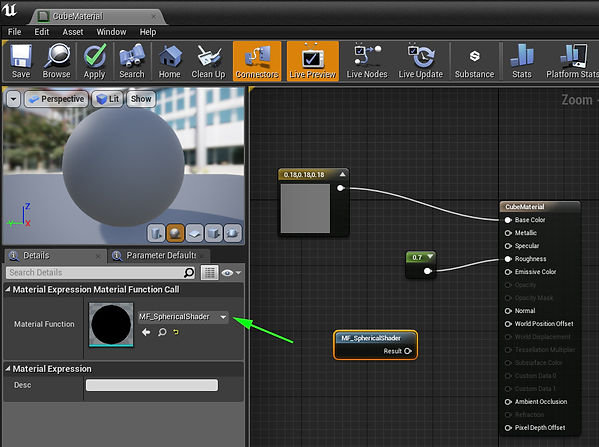
5. Right click on an empty spot and add a MaterialFunctionCall node.

6. With the node selected, choose the material function MF_SphericalShader in the Details panel.

7. Connect the material function to the World Position Offset pin of the material.

8. Click Apply, then Save.

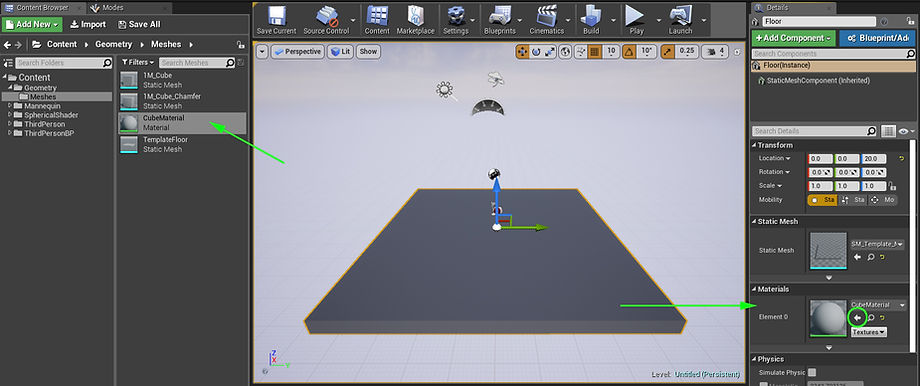
9. In the Viewport where the level is displayed, select the gray checkerboard floor.
10. With CubeMaterial selected in the Content Browser, and the floor selected in the Viewport, find the Materials section in the floor’s Details panel and click the white arrow pointing left to assign the material CubeMaterial to the floor.

11. The floor should now appear solid gray.
12. In the Content Browser, go the folder Content/ThirdPersonBP/Blueprints and double click the blueprint ThirdPersonCharacter. Note that this is the ThirdPersonCharacter blueprint that is part of the Third Person template, and not the one that comes with Spherical Shader. We will be adding spherical functionality to this one.

13. Select Add Component. Start typing “BPC” and add the component BPC_SphericalShader.

14. Click Compile and Save.

15. Return to the main viewport and press Play. The player character should now appear to be running on a spherically curved floor.

Demo Content Breakdown
To view the demo content, in the Content Browser, go to Content/SphericalShader/Demo and double click SphericalDemoMap.
Spherical Shader in the World
The demo content showcases Spherical Shader applied to Static Meshes, Landscape, and Foliage. The material function MF_SphericalShader has been added to the following master materials located in Content/SphericalShader/Demo/MasterMaterials
-
M_BaseMaterial_Sph
-
M_Foliage_Sph
-
M_Landscape_Sph
The objects in the world (excluding the character) all use material instances of one of the 3 master materials listed above.

Spherical Shader on the Character
The character blueprint for this map is the blueprint ThirdPersonCharacter that is located in the folder Content/SphericalShader/Demo/ThirdPerson/Blueprints. The blueprint component BPC_SphericalShader has been added to this blueprint.
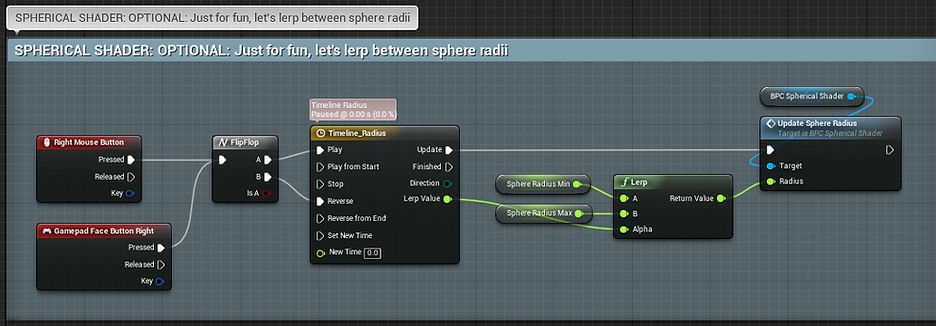
In addition, a fun feature has been added to change the sphere radius in real time. When the right mouse button is pressed, or the B button on a gamepad, a Timeline is used to lerp between radii and set the Sphere Radius parameter on BPC_SphericalShader.

VSync
VSync prevents screen tearing and frame rate choppiness by syncing the refresh rate of the game to the monitor it is being displayed on. This should be applied in your own game wherever you are changing graphics settings.
However, for this demo, the setting is changed on the character blueprint for convenience, so you can reference the nodes required to change this setting.
The function EnableVsync is called at BeginPlay.

The function does the following to enable VSync.

Q&A
Q: DOES THIS WORK ON MOBILE?
A: Although mobile is not officially supported, the shader has been tested in editor and works in Android ES2 Preview, iOS ES3.1 Preview, and Mobile Preview ES2 (PIE). In addition, the shader is confirmed to work on the following devices:
-
Galaxy S9 (Android 9 ES2)
-
Pixel 2 (Android 9 ES2)
-
Nexus 6P (Android 8.1 ES2)
Q: DOES THIS WORK IN FIRST PERSON MODE?
A: The shader will make things look spherical in first person, however, mechanics such as aiming in an FPS will not appear accurate. Since collision is not affected, aiming at something which visually appears in front will actually aim at the floor’s collision, as illustrated below.

Troubleshooting
Issue: Objects Appear Flattened or Oblique
Solution: Spherical Shader uses World Position Offset to shift existing vertices around on a mesh to make it appear spherical. If the effect is chunky or distorted, try adding subdivisions to your mesh, either in the art asset, or through the tessellation parameter in your material.
Issue: Objects Flicker in the Distance
Solution: Increase the bounds of the objects. This can be set in any of the following ways:
-
On a Static Mesh Asset: Increase the Positive Bounds Extension and Negative Bounds Extension in the Details panel General Settings section
-
In a Blueprint: Increase the Bounds Scale of the static mesh or skeletal mesh in its Details panel in its Blueprint in the Rendering section
-
On a Static Mesh Placed in the World: Increase the Bounds Scale by selecting the mesh in the World Outliner and setting its Bounds Scale to be larger in the Details panel Rendering section
-
For Flickering Landscape: Increase the Negative ZBounds Extension and Positive ZBounds Extension by selecting the Landscape and setting these settings in the Details panel Landscape section
Issue: Objects Darken as They Get Farther Away
Solution: This might be due to vertices being offset into dark areas of the Lightmap Volume in your level. This anomaly is more noticeable on smaller objects the more downward facing the primary light source in the scene is, such as when the sun is directly above. To address this, try the following:
-
Disable Volumetric Lightmap by setting Volume Lighting Method to Sparse Volume Lighting Samples in the map’s World Settings.

-
Or try to minimize the effect by rotating or otherwise adjusting the lighting in a way that the area underneath the object would not be as dark.
-
If your map is a procedurally generated environment and/or has fully dynamic lighting and shadowing, consider enabling Force No Precomputed Lighting. This is an advanced setting in World Settings --> Lightmass that disables lighting and shadowing interactions that are normally precomputed.
Issue: In the Demo Content Map, the Character Doesn’t Move or Has Limited Controls
Solution: Check your input mappings in Project Settings --> Input. The character uses the following standard input mappings from the Third Person Template.

Issue: The Build of My Game Has Screen Tearing or is Choppy
Solution: This is most likely due to VSync being disabled. VSync prevents screen tearing and frame rate choppiness by syncing the refresh rate of the game to the monitor it is being displayed on. Enabling VSync should be applied in your own game wherever you are changing graphics settings. For reference, the nodes for enabling VSync are shown below.

Troubleshooting (UE5)
Issue: Environment textures appear to smear when moving around
Solution: This could be an issue with the TSR anti-aliasing method in UE5. Try switching the anti-aliasing mode by going to Edit —> Project Settings and under Engine —> Rendering change Anti-Aliasing Method to Temporal Anti-Aliasing (TAA) or some other method.
Issue: Terrain far away does not curve
Solution: This could be due to the terrain being part of a World Partition and needing to be calculated even though it’s far away. If this is the case, try selecting all of the landscape objects in the Outliner, and then in the details panel unchecking the checkbox for “Is Spatially Loaded”.
